[253] 옵시디언 Ulysses/iA Writer와 유사하게 설정하기
페이지 정보
 shunnna
본문
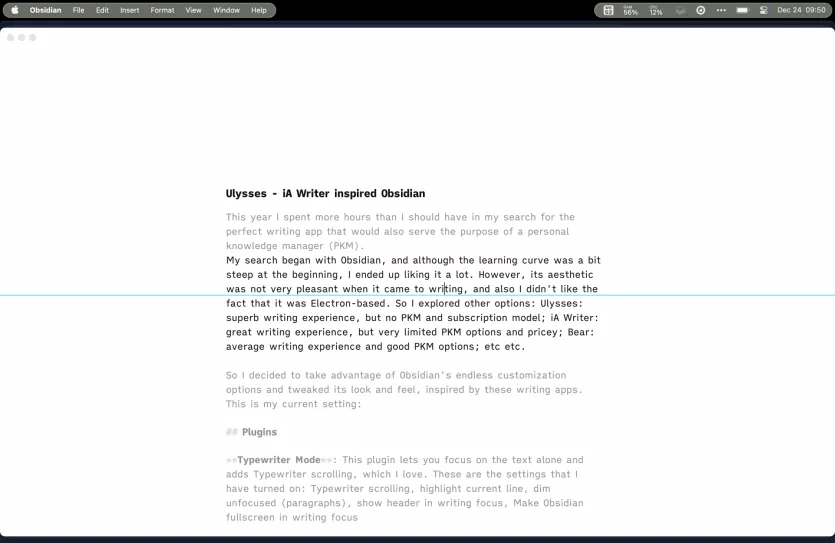
Obsidian의 무한한 커스터마이징 기능을 활용하여 Ulysses 및 iA Writer와 같은 글쓰기 앱에서 영감을 받아 Obsidian을 개인화하는 방법을 단계별로 설명드리겠습니다. 이 설정은 Typewriter Mode, Hider, Minimal Theme Settings 등의 플러그인을 사용하며, 글쓰기 경험을 극대화하고 깔끔한 인터페이스를 제공합니다.
1. Obsidian 플러그인 설치 준비
- 커뮤니티 플러그인 활성화:
- Obsidian 설정(Settings) → "Community Plugins"로 이동.
- "Safe Mode"를 꺼서 커뮤니티 플러그인을 설치할 수 있도록 설정.
2. 주요 플러그인 설치 및 설정
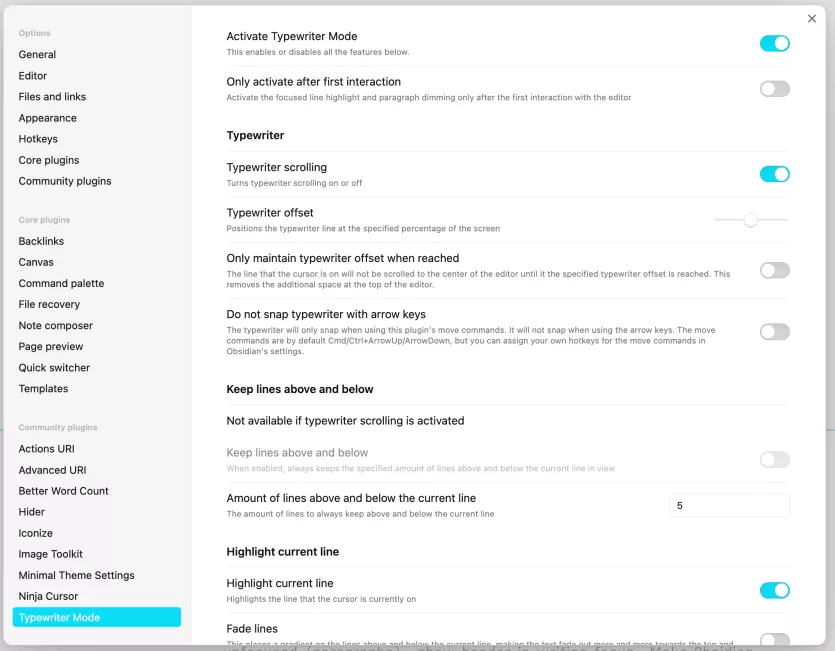
(1) Typewriter Mode
- 기능: 현재 줄 고정 스크롤, 비집중 단락 흐림 처리, 헤더 강조 등으로 글쓰기 몰입감을 제공합니다.
- 설치 방법:
- Obsidian 설정 → "Community Plugins" → "Browse" 클릭.
- "Typewriter Mode" 검색 후 설치 및 활성화.
- 설정:
- Typewriter scrolling (현재 줄 고정 스크롤링)
- Highlight current line (현재 줄 강조)
- Dim unfocused paragraphs (비집중 단락 흐림)
- Fullscreen writing focus (전체 화면 글쓰기 모드)
(2) Hider
- 기능: UI 요소를 숨겨 깔끔한 인터페이스 제공.
- 설치 방법:
- 동일한 방식으로 "Hider" 플러그인 검색 후 설치 및 활성화.
- 설정:
- Hide tab bar (탭 바 숨기기)
- Hide vault name (볼트 이름 숨기기)
- Hide scroll bars (스크롤 바 숨기기)
(3) Minimal Theme Settings
- 기능: 미니멀 테마와 함께 다양한 커스터마이징 옵션 제공.
- 설치 방법:
- "Minimal Theme Settings"와 "Style Settings" 플러그인을 설치 및 활성화.
- Appearances → Themes → Minimal 테마를 검색해 설치 후 적용.
- 설정:
- Colorful active states (컬러풀한 활성 상태)
- Minimal status bar (간소화된 상태 표시줄)
- Focus mode (집중 모드)
- Underline internal/external links (내부/외부 링크 밑줄)
(4) Ninja Cursor
- 기능: 부드러운 커서 움직임 제공 (Ulysses 스타일 구현).
- 설치 방법:
- Ninja Cursor 플러그인을 설치 및 활성화.
- CSS 스니펫 추가:
- Obsidian 설정 → Appearance → CSS Snippets → 새 스니펫 추가.
- 아래 코드를 복사해 붙여넣고 저장 후 활성화.
/* Styling for the Ninja Cursor*/
.theme-dark .x-cursor {
background: white;
width: 1px;
transition: all 80ms !important;
transition: opacity;
top: calc( -2.5px - var(--header-height));;
height: calc(2.5px + var(--cursor-height));
}
.theme-light .x-cursor {
background: black;
width: 1px;
transition: all 80ms !important;
transition: opacity;
top: calc( -2.5px - var(--header-height));;
height: calc(2.5px + var(--cursor-height));
}
/* Hides Regular Cursor when Highlighting Text*/
body:has(.x-cursor) .cm-editor * {
caret-color: transparent;
}
/* Disable movement effect */
.cursorWrapper .x-cursor::after {
display: none;
}
/* Remove normal cursor on text selection */
.cm-cursorLayer {
animation: none !important;
}
/* Blinking */
.cursorWrapper .x-cursor0 {
animation: blink0 1s 1s both infinite;
}
.cursorWrapper .x-cursor1 {
animation: blink1 1s 1s both infinite;
}
@keyframes blink1 {
0% { opacity: 1; }
45% { opacity: 1; }
50% { opacity: 0.3;}
95% { opacity: 0; }
100% { opacity: 0.3; }
}
@keyframes blink0 {
0% { opacity: 1; }
45% { opacity: 1; }
50% { opacity: 0.3;}
95% { opacity: 0; }
100% { opacity: 0.3; }
}
3. iA Writer 폰트 적용
- iA Writer의 폰트를 다운로드하여 적용:
- iA Fonts GitHub에서 폰트를 다운로드.
- Obsidian 설정 → Appearance → Fonts에서 사용자 지정 폰트로 추가.
4. 최종 결과 확인
위 단계를 완료하면 Obsidian이 Ulysses와 iA Writer에서 영감을 받은 깔끔하고 몰입감 있는 글쓰기 환경으로 변신합니다. 필요에 따라 추가적인 CSS 스니펫이나 플러그인을 활용하여 더 세부적으로 커스터마이징할 수 있습니다.


