[246] 옵시디언 스크린라이팅 CSS Snippet 소개 글
페이지 정보
 shunnna
본문
다음 글은 Obsidian(옵시디언)에서 **스크린플레이(Screenplay)**를 작성하고, 이를 PDF로 잘 포맷된 스크립트 형태로 내보낼 수 있도록 돕는 CSS 스니펫을 소개하는 내용입니다. Markdown 형식으로 간단히 작성하면 자동으로 영화 대본 형식으로 렌더링되며, PDF로 내보낼 때도 전문적인 포맷을 유지할 수 있습니다. 아래는 해당 스니펫의 기능과 옵시디언에서 구현하는 방법을 단계별로 설명합니다.
1. CSS 스니펫의 주요 기능
- 자동 포맷팅: Markdown의 헤더와 텍스트를 영화 대본 형식으로 변환.
#(Header 1): 장면 헤딩(Scene Heading/Shot).##(Header 2): 캐릭터 이름(Character Name).###(Header 3): 괄호 속 지시문(Parenthetical).####(Header 4): 화면 전환(Transition).#####(Header 5): 액트(Act).
- 대화(Dialogue) 자동 정렬: 캐릭터 이름 아래에 이어지는 텍스트는 대화로 자동 정렬.
- PDF 내보내기 최적화: PDF로 내보낼 때 Celtx나 Studiobinder와 동일한 라인 간격 및 포맷 유지.
- 스타일 커스터마이징: 폰트를 기본 제공된 'Courier Prime' 외 다른 폰트로 변경 가능.
2. 옵시디언에서 스니펫 구현 방법
1단계: CSS 파일 생성
- 옵시디언 설치 폴더에서 사용자 CSS 파일을 저장할 디렉토리를 엽니다:
- 경로:
옵시디언 설정 > 모양 > 사용자 스타일(CSS Snippets).
- 경로:
- 위 코드 전체를 복사하여 새로운
.css파일을 생성합니다.- 예:
screenplay.css.
- 예:
2단계: CSS 파일 활성화
- 옵시디언 설정에서사용자 스타일 활성화:
옵시디언 설정 > 모양 > 사용자 스타일(CSS Snippets)에서 새로 만든screenplay.css를 활성화합니다.
3단계: 스크린플레이 클래스 적용
- 대본을 작성할 노트에 다음 클래스를 추가합니다:
---
cssclass: screenplay
---- 이 코드는 해당 노트에만 스크린플레이 스타일을 적용합니다.
4단계: Markdown 문법으로 대본 작성
Markdown 문법을 사용하여 대본을 작성합니다:
- 장면 헤딩(Scene Heading):
# INT. LOCATION - TIME - 캐릭터 이름(Character Name):
## CHARACTER NAME - 괄호 속 지시문(Parenthetical):
### (지시문) - 대화(Dialogue): 캐릭터 이름 아래 일반 텍스트 작성.
- 화면 전환(Transition):
#### CUT TO:등. - 액트 구분(Act):
##### ACT I.
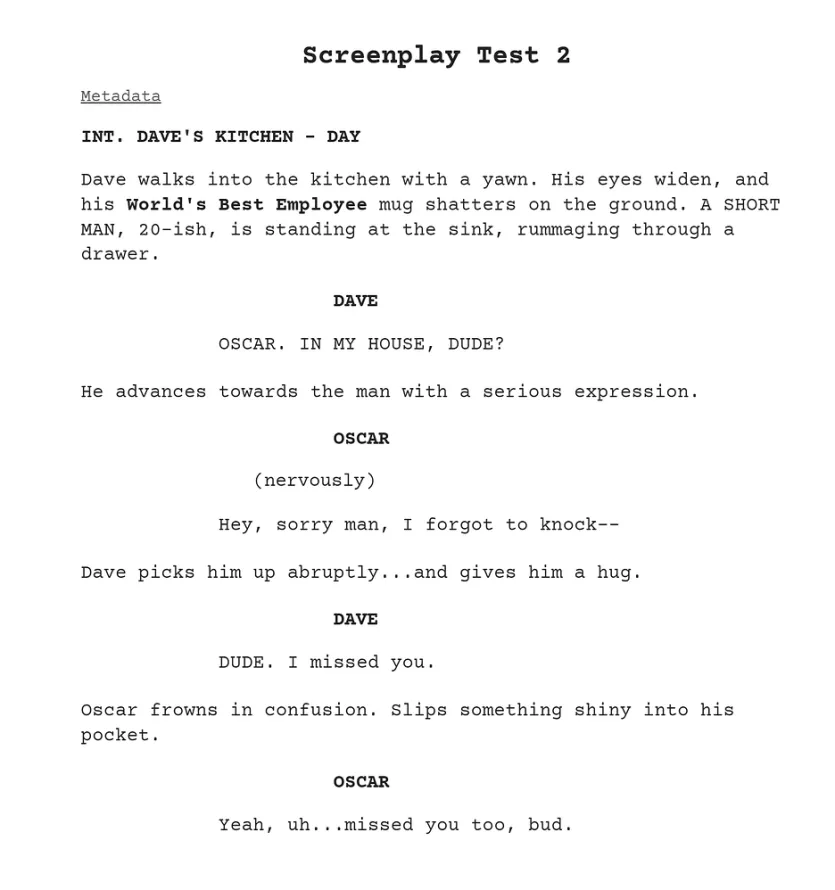
예제:
# INT. DAVE'S KITCHEN - DAY

Dave walks into the kitchen with a yawn. His eyes widen, and his **World's Best Employee** mug shatters on the ground.

## DAVE
OSCAR. IN MY HOUSE, DUDE?

He advances towards the man with a serious expression.

## OSCAR
### (nervously)
Hey, sorry man, I forgot to knock--
5단계: PDF로 내보내기
- 작성한 노트를 프린트(PDF) 형태로 내보냅니다:
- 옵시디언 메뉴에서
파일 > 내보내기 > PDF.
- 옵시디언 메뉴에서
- 출력된 PDF는 영화 대본 표준 형식으로 렌더링됩니다.
3. 추가 팁
- 폰트 변경: 기본 폰트를 다른 폰트로 변경하려면 CSS의 다음 부분을 수정하세요:원하는 Google Fonts URL로 교체하면 됩니다.
- 페이지 구분: Markdown에서 수평선(
---)을 추가하면 페이지가 강제로 나뉩니다.
이 CSS 스니펫은 간단한 Markdown 문법만으로 전문적인 영화 대본을 작성하고 출력할 수 있도록 도와줍니다. 이를 통해 Obsidian에서도 효율적으로 창작 작업을 진행할 수 있습니다!
Snippet
@import url('https://fonts.googleapis.com/css2?family=Courier Prime:ital,wght@0,400;0,700;1,400;1,700&display=swap');
body {
--screenplay-font: 'Courier Prime';
}
.screenplay {
font-family: var(--screenplay-font), 'Courier', var(--font-monospace) !important;
--h1-font: var(--screenplay-font) !important;
--h2-font: var(--screenplay-font) !important;
--h3-font: var(--screenplay-font) !important;
--h4-font: var(--screenplay-font) !important;
--h5-font: var(--screenplay-font) !important;
--h6-font: var(--screenplay-font) !important;
--file-margins: 1in 1in 1in 1.5in !important;
--file-line-width: 6.2in !important;
font-size: 12pt;
--font-text: var(--screenplay-font);
line-height: 1.3;
}
.screenplay .markdown-preview-view .cm-line, .screenplay .markdown-source-view .cm-line {
font-family: var(--screenplay-font) !important;
}
/* scene headings */
.screenplay h1, .screenplay .HyperMD-header-1 {
font-size: inherit;
text-transform: uppercase;
font-weight: 600;
}
/* character names */
.screenplay h2, .screenplay .HyperMD-header-2 {
font-size: inherit;
padding-left: 2.2in !important;
text-transform: uppercase;
margin-top: 0.2in;
}
/* dialogue */
.screenplay div:has(h2) + div:has(p),
.screenplay div:has(h3) + div:has(p),
.screenplay .HyperMD-header-2 + .cm-line,
.screenplay .HyperMD-header-3 + .cm-line {
padding-left: 1.2in !important;
max-width: 5in !important;
margin-bottom: 0.2in;
}
/* transitions */
.screenplay h4, .screenplay .HyperMD-header-4 {
text-align: right;
font-size: inherit;
font-weight: 600;
}
/* parentheticals */
.screenplay h3,
.screenplay .HyperMD-header-3 {
padding-left: 1.5in !important;
font-size: inherit;
font-weight: normal;
}
/* Acts */
.screenplay h5,
.screenplay .HyperMD-header-5 {
padding-left: 2.5in !important;
text-decoration: underline;
}
/* inlint title */
.screenplay .inline-title{
font-size: 17pt;
text-align: center !important;
width: 100% !important;
font-family: var(--h1-font);
}
/* frontmatter */
.screenplay .frontmatter-container .frontmatter-container-header {
border-bottom: none;
color: var(--text-muted);
padding: 0px;
text-decoration: underline;
}
.screenplay .frontmatter-container {
padding: 0px;
margin: 0px 0px 0px 0px;
background-color: transparent;
border: none;
}
.screenplay .frontmatter-section >* {
flex-wrap: wrap;
font-size: var(--font-smaller) !important;
}
/* highlights */
.screenplay.markdown-rendered mark,
.cm-highlight {
background-color: transparent !important;
text-decoration: underline;
font-weight: 600;
}
/* links */
a {
font-family: inherit;
color: var(--text-normal);
text-decoration-color: var(--text-accent);
}
/* printing elements */
@media print {
/* scene headings */
body {
font-size: 12pt !important;
--file-line-width: 8.5in !important;
}
.print .markdown-preview-view {
max-width: var(--file-line-width);
margin: auto;
padding: 0px;
}
h1 {
font-size: inherit;
text-transform: uppercase;
font-weight: 600;
}
/* character names */
h2 {
font-size: inherit;
padding-left: 2.2in !important;
text-transform: uppercase;
margin-top: 0.2in;
}
/* dialogue */
h2 + p,
h3 + p {
padding-left: 1.2in !important;
max-width: 5in !important;
margin-bottom: 0.2in;
}
/* transitions */
h4 {
text-align: right;
font-size: inherit;
font-weight: 600;
}
/* parentheticals */
h3 {
padding-left: 1.5in !important;
font-size: inherit;
font-weight: normal;
}
/* Acts */
h5 {
padding-left: 2.5in !important;
text-decoration: underline;
}
/* force page break with hr */
hr {
break-after:page;
visibility: hidden;
}
}
/* @settings
name: Screenplay
id: screenplay-settings
settings:
-
id: screenplay-font
title: Font
type: variable-text
default: 'Courier New'
*/


inspri님의 댓글